
![The Great Fence Debate Wood Versus Vinyl [How to Choose]](https://www.dcfence.com/wp-content/uploads/2024/04/The-Great-Fence-Debate-Wood-Versus-Vinyl-How-to-Choose-300x157.webp)
The Great Fence Debate: Wood Versus Vinyl [How to Choose?]
When it comes to enhancing the privacy, security, and aesthetic appeal of your home, few elements play as pivotal a role as your choice of
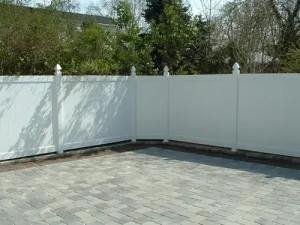
Have you been considering fencing in your yard or other outdoor living space? A vinyl fence is a great way to increase your home or business’s security and aesthetic quality. Vinyl is incredibly durable, simple to clean, and low maintenance – making it an ideal choice for anyone looking for a longer-lasting fence.
Luckily, with this ultimate vinyl fence installation tutorial, you’ll know how to properly install one of these great fences. In this guide, you’ll learn all about what materials you will need for installation, what tools you should use, and how to prepare your ground for building. Then, with our tips and tricks, you’ll master vinyl fence installation quickly.
Before installing a vinyl fence, it is crucial to take a few preliminary steps to ensure a successful setup. Proper preparation will help ensure your fence looks great and lasts for years.
Before diving into any other tasks, take a moment to carefully measure out the exact area you plan on covering with your brand-new fence.
By meticulously measuring the perimeter, you’ll be able to ensure accurate calculations of the required materials for the project.
This step not only helps in preventing any potential last-minute problems or surprises but also guarantees a smoother and more efficient fence installation process. So, grab your measuring tape and let’s get started on this exciting project!
When embarking on your fencing project, it is crucial to ensure that you have everything prepared and ready. This includes gathering all the necessary tools to facilitate the process.
For example, having a sturdy spade for digging the posts, a reliable level to keep your panels perfectly upright, and don’t forget the unique vinyl fence mounting tools that offer the highest level of stability.
By having these tools at your disposal, you can confidently tackle your fencing project with ease and precision, ensuring a successful and long-lasting result.
To ensure compliance with government regulations and respect for your neighbors’ rights, it is important to thoroughly check if your fence meets all the necessary requirements.
This may involve a visit to your local municipality or zoning office to seek clarification and answers to any questions you may have.
Additionally, it is advisable to consult with your local building inspector to obtain precise information regarding the depth, diameter, and shape of the footings needed for your fence.
It’s worth noting that specific codes may require the bottom of the footing to be wider than the top. If you feel unsure or need expert guidance, a reputable fencing contractor can provide valuable advice on the necessary steps to take before proceeding with the installation of your vinyl fence.
By diligently following these guidelines, you can ensure a smooth and compliant installation process.
Exploring various designs and styles of vinyl fences allows you to make a choice that harmonizes perfectly with your property’s aesthetics and caters to your preferences.
There’s an array of designs, from classic white picket fences to more modern, streamlined options. Privacy fences with tall, closely-spaced panels provide seclusion, while semi-private styles allow for airflow and partial visibility.
For a more decorative touch, consider lattice or scalloped designs. Functionality is integral too. For instance, choose a durable, reinforced model for high-wind areas or opt for a pool fence designed to meet safety regulations.
Before making your decision, weigh up these factors to ensure the fence you choose not only looks good but also meets your practical needs.
In order to fully comprehend the construction of a vinyl fence, it is important to break down and examine its various components.
These components include posts, which serve as the foundation and provide stability; rails, which connect the posts and support the panels; panels, which are the main barrier and come in different styles and sizes; and brackets, which securely hold the panels in place.
By gaining a comprehensive understanding of each part’s role in the overall structure, you can ensure a seamless and hassle-free installation process, resulting in a durable and visually appealing vinyl fence for your property.
A critical yet often overlooked aspect of vinyl fence installation is the preliminary soil analysis. The type of soil where you intend to erect your fence significantly affects the installation process and overall fence stability.
Soil types vary in their composition, and this diversity influences their bearing capacity and drainage.
For instance, loamy soil, with its balanced mix of sand, silt, and clay, offers excellent support and is ideal for fence installations.
Conversely, sandy soil, due to its loose nature, may require additional support like concrete footings to prevent the fence from leaning or sagging.
Clayey soil, while firm and supportive, tends to retain water – a characteristic that can lead to post-decay over time. In such a scenario, proper drainage measures become a necessity.
Conducting a soil analysis before you start will help you determine the necessary preparations and adjustments, ensuring a strong, stable, and long-lasting vinyl fence. It’s all about building with your specific environment in mind.
Dealing with sloped or uneven ground poses a unique challenge when installing a vinyl fence. However, there are reliable techniques that ensure your fence remains level, visually appealing, and structurally intact, even on a challenging landscape.
The two main methods are ‘racking’ and ‘stepping’.
The ‘racking’ method involves adjusting the rails to follow the slope of the ground, which keeps the fence panels horizontal.
This technique ensures a continuous, smooth line, which can be more aesthetically pleasing. However, racking may not be suitable for steeper slopes.
The ‘stepping’ method, on the other hand, keeps the panels horizontal, but the posts are installed at different heights to follow the slope, creating a stepped effect.
While this technique can handle steeper slopes more effectively, it may leave gaps under the fence on uneven ground, which might need to be filled for security or privacy purposes.
Both methods require careful measurement and planning but can result in a beautiful, functional vinyl fence, even on sloped or uneven terrain. Always remember, the key to a successful installation on challenging landscapes is patience, precision, and a readiness to adapt to the land’s unique contours and characteristics.
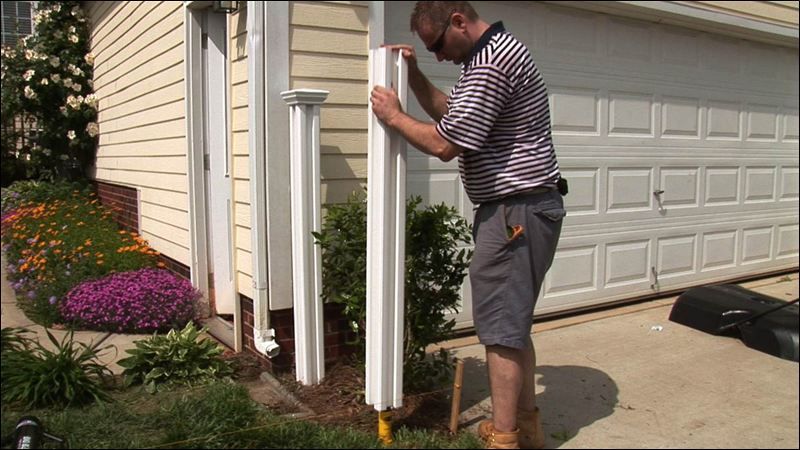
Assembling the vinyl fence is a straightforward process that can be carried out with only a few basic tools. Once you have the necessary components and material, follow the steps outlined below to get started:
Step 1
The first crucial step in installing your vinyl fence is marking the post placements accurately. Take into account the property lines and any other space constraints before you begin.
Use stakes to denote these positions, ensuring each stake is in contact with the layout string, which serves as your guide for a straight and well-aligned fence.
It’s essential not to forget about your gate locations when marking as they will require additional spacing and special posts for secure installation. The marked locations represent where each fence post will be installed, forming the backbone and structure of your vinyl fence.
Step 2
After marking all the post locations, the next step is to dig the post holes. The depth of these holes largely depends on the size of the fence you’re installing.
For smaller fences, aim for a depth of about one foot. However, if it’s a larger fence, the recommended depth is two feet.
These measurements ensure that the posts have a firm and stable foundation, keeping your fence upright and steady.
To dig these holes, you can use a post-hole digger or power drill. The holes should be approximately 10 inches in diameter to accommodate the size of the fence posts.
Moreover, it’s advisable to dig an extra six inches deeper than required, particularly if the soil conditions in your area are less than ideal.
This extra space will be backfilled with gravel, which aids in drainage and prevents water from pooling around your fence posts.
Once the holes are dug to the correct depth and diameter, you can move on to the next step in the installation process: setting the fence posts in concrete for maximum stability.
Step 3
Setting the posts forms the next stage in the installation process. Begin by adding a layer of gravel or sand to the bottom of each hole.
This step is crucial as it ensures proper drainage and provides a stable base for your posts. The gravel or sand acts to divert water away from the base of the post, preventing waterlogging and subsequent damage.
Once the base is prepared, you can start setting the posts into the holes. Ensure each post is plumb and at the correct height, then pour concrete around it, filling the hole up to ground level.
The concrete will secure the post in place, giving your fence the sturdy foundation it requires. Remember to let the concrete dry and harden fully before proceeding to the next step.
This may take anywhere from 24 to 48 hours depending on the weather conditions. Proceed to the next post and repeat the process until all posts are securely set.
Step 4
The panel installation process begins once all the fence posts are set in place and the concrete has completely dried. Start by securing the fence rails to the posts.
These rails form a framework that holds the fence panels. Depending on your fence design, these will be horizontal pieces that you attach to the posts at specific intervals, usually at the top and bottom of the fence line.
Use a level to ensure they’re straight and secure them using screws or nails, whichever is recommended for your specific type of fence.
Next, proceed with the installation of the fence panels. These panels will fit into the brackets that you’ve affixed to the fence rails.
Ensure that the panels are level and correctly aligned, as this is crucial for the aesthetics and stability of your vinyl fence.
Once the panel is squared up, secure it to the rail hangers using screws. Repeat this process for each panel, working your way along the fence line until all panels are securely attached to the rails. This step completes the primary structure of your fence, and you can proceed to the final touches of the installation process.
Installing the gate is an essential part of the fence installation process. The type of gate you choose will not only impact the overall look of your fence but also its functionality.
There are numerous design options to consider, including single gates for foot traffic and larger double gates for vehicles. Each design has its own unique installation requirements, so it’s crucial to take this into account when planning your project.
Gate Measurement
Accurate gate measurement is paramount to ensure a seamless fit within the fence. When measuring for your gate, take into account both the actual width of the gate panel and the space needed for hardware, which typically requires an additional 1.5 to 2 inches on each side.
Gate Alignment
In terms of alignment, your gate should be level and square with the fence line. This ensures that it functions correctly and maintains the integrity of the fence structure. It’s recommended to use a level to check both the gate and the posts for straightness during and after installation. If any adjustments are needed, make these before securing the gate hardware.
Finally, remember to install sturdy hinges and a latch mechanism to secure your gate. This hardware should be rust-resistant and robust enough to bear the weight of the gate. Once your gate is installed, inspect it regularly to ensure it continues to function correctly and does not compromise your fence’s stability.
Maintaining your new vinyl fence is quite straightforward, thanks to its durable and resilient nature. Unlike wood fences, vinyl does not rot or warp, and it can endure harsh weather conditions, including heavy rain, snow, and even intense sunlight.
However, some basic care and maintenance are still required to keep your fence in the best condition.
Regular cleaning is essential and can be done using a mild soap and water mixture. Cleaning helps to remove dirt and grime that may have built up on the fence over time, maintaining its aesthetic appeal.
Periodically inspect the fence for any signs of damage or loose parts that may need repair. Pay particular attention to the gate and its hardware, as these parts often experience the most use and wear.
Lastly, always ensure that the area around your fence, particularly at the base, is free from heavy debris or overgrown vegetation.
These can trap moisture against the fence, leading to unnecessary wear over time. With these simple maintenance steps, your vinyl fence should continue to look great and serve its purpose for many years to come.
Cleaning your vinyl fence is crucial; a simple solution of warm water and mild soap will do the trick! Cleaning regularly will help keep your fence free from sap, stains, cracks, and other damage caused by dirt and wear.
Checking for damages and repairs after a major wind or snowstorm and any significant temperature fluctuations is essential.
A quick walk around your property should give you an idea if anything needs to be attended to; if you see any discoloration, holes, cracks, or sagging sections in your vinyl fence, these are sure signs that it needs repair.
Regular inspection and post-installation maintenance ensure everything remains in great shape. A close look at all the parts once a year will help prevent common issues such as cracking, fading, or warping in the posts.
Remember those seasonal touch-ups too! Regular maintenance can help you avoid costly repair bills and ensure your fence looks great for years.
Vinyl fences create a lasting, sturdy silhouette in your backyard, and with proper installation and maintenance, it can stay looking fresh for years.
Getting started with the installation process doesn’t have to be intimidating; it requires careful attention to detail.
However, if you are unsure about any aspect of this project or would like a professional assessment before beginning, don’t hesitate to look for a specialist in vinyl fence installation – such as D&C Fence Co., who can ensure everything is done correctly.
By submitting, you agree to receive emails from Uscreen and to our privacy policy.
When it comes to enhancing the privacy, security, and aesthetic appeal of your home, few elements play as pivotal a role as your choice of
PVC (Polyvinyl Chloride) fencing is a type of synthetic plastic fence that offers a modern alternative to traditional materials like wood and metal. Distinguished by
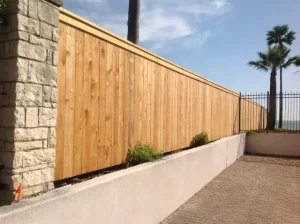
Wood fences are one of the most traditional and versatile types of fencing used to delineate property lines, enhance privacy, and contribute to the aesthetic
Complete the form below and a representative will contact you shortly.