
![The Great Fence Debate Wood Versus Vinyl [How to Choose]](https://www.dcfence.com/wp-content/uploads/2024/04/The-Great-Fence-Debate-Wood-Versus-Vinyl-How-to-Choose-300x157.webp)
The Great Fence Debate: Wood Versus Vinyl [How to Choose?]
When it comes to enhancing the privacy, security, and aesthetic appeal of your home, few elements play as pivotal a role as your choice of

Adding a vinyl fence gate to your property can offer increased privacy, security, and aesthetic appeal. With numerous styles and sizes, vinyl fence gates can be tailored to suit your unique needs and preferences. First, we’ll provide helpful tips on how to install vinyl fence gates like a pro, ensuring a beautiful and functional addition to your outdoor space. Then, let’s dive into the installation process and help you make the most of your new vinyl fence gate.
Before installing a gate, it is crucial to undertake a few pre-installation preparations. Start by accurately measuring and marking the gate opening to ensure a proper fit. This step helps determine the dimensions and layout required for the gate installation.
Next, gather all the necessary tools and equipment for the installation process. It typically includes a tape measure, level, drill, screws, and hinges.
Finally, you must check local regulations and codes that may apply to gate installations in your area. It ensures compliance with specific requirements or restrictions and helps avoid potential legal issues.
Once the pre-installation preparation is complete, the next step in installing a gate is to work on the gate posts. Start by digging the post holes in the designated locations.
The holes’ size and depth will depend on your gate’s specific requirements and the soil type in your area. Once the holes are ready, place the gate posts into them, ensuring they are level and aligned correctly.
Pour concrete into the holes around the posts to secure the posts in place. It helps provide stability and ensures that the gate posts are firmly anchored. Allow the concrete to dry and cure per the manufacturer’s instructions before moving on to the next step.
Once the gate posts are securely in place, the next step in installing a gate is to focus on the gate hardware. Start by attaching the hinges to the gate.
Depending on the type of gate and hinges being used, this may involve drilling pilot holes and screwing the hinges onto the gate frame. Ensure that the hinges are correctly aligned and securely attached to provide smooth movement for the gate.
Next, install the gate latch, which allows you to open and close the gate securely. Position the latch on the gate frame, aligning it with the corresponding latch receiver on the gate post. Screw or fasten the latch securely, ensuring it functions properly.
Finally, make any necessary adjustments to the gate hardware to ensure the gate opens and closes smoothly. It may involve tightening or loosening screws, aligning the gate latch, or adjusting the hinges.
Once the gate hardware is installed correctly, the next step is to hang the gate. Begin by placing the gate in the gate opening, ensuring it aligns perfectly with the gate posts and is level. Next, depending on the type of hinges used, attach the gate to the hinges using the provided screws or bolts.
Finally, ensure the gate is securely fastened to the hinges to prevent wobbling or instability.
After attaching the gate, check the gate swing by opening and closing it to ensure it operates smoothly. Verify that the gate opens, closes without obstruction, and swings freely within the desired range.
Next, adjust the hinges or make any necessary tweaks to the gate’s position to ensure proper swing and operation. Correctly hanging the gate is crucial for its functionality and overall appearance, so take the time to ensure it is aligned and swings smoothly.
The final step in installing a gate involves completing the finishing touches. If needed, cut the gate to fit the opening perfectly. It may include trimming the gate’s width or height to ensure a proper fit. Use appropriate tools, such as a saw, to make precise cuts.
Finally, clean up the installation area once the gate is correctly sized by removing debris, excess dirt, or construction materials. It helps create a clean and tidy appearance.
Finally, test the gate to ensure it functions correctly. First, open and close the gate several times, checking for any issues or sticking points. Next, verify that the gate latches securely and operates smoothly. Making these final adjustments and checks ensures that the gate is installed correctly and is ready for use.
After installing a vinyl fence gate, following proper maintenance and care is essential to ensure its longevity and functionality. Regular cleaning of the gate with a mild detergent and water can help prevent dirt and grime buildup.
Avoid using abrasive cleaners or tools that may damage the gate’s surface. Inspect the gate periodically for any signs of damage, such as cracks or loose components, and address them promptly to prevent further issues. Lubricate the hinges and latch regularly to ensure smooth operation.
Additionally, protect the gate from excessive exposure to sunlight by applying a UV protectant or using a gate cover.
Regarding common issues, sagging or misalignment of the gate may occur over time. It can be fixed by adjusting the hinges or adding additional support. If there are any significant damages or structural issues, it may be necessary to contact a professional for repairs.
Installing a vinyl fence gate is integral to ensure that your work is secure and attractive. Whether it’s a residential or commercial installation, follow the steps outlined in this article for a professional result. Plus, you may save time and money by tackling it yourself.
Still, if you’re feeling unsure about more complex installations, the experienced team at D&C Fence Co. can help. Our team is unparalleled in terms of skill and dedication, and we are committed to providing our clients with the best possible service. Contact us to learn more!
By submitting, you agree to receive emails from Uscreen and to our privacy policy.
When it comes to enhancing the privacy, security, and aesthetic appeal of your home, few elements play as pivotal a role as your choice of
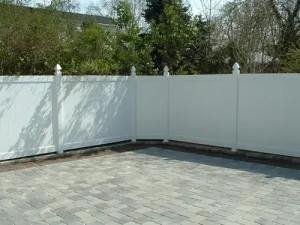
PVC (Polyvinyl Chloride) fencing is a type of synthetic plastic fence that offers a modern alternative to traditional materials like wood and metal. Distinguished by
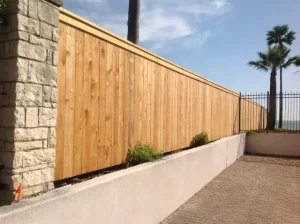
Wood fences are one of the most traditional and versatile types of fencing used to delineate property lines, enhance privacy, and contribute to the aesthetic
Complete the form below and a representative will contact you shortly.