
![The Great Fence Debate Wood Versus Vinyl [How to Choose]](https://www.dcfence.com/wp-content/uploads/2024/04/The-Great-Fence-Debate-Wood-Versus-Vinyl-How-to-Choose-300x157.webp)
The Great Fence Debate: Wood Versus Vinyl [How to Choose?]
When it comes to enhancing the privacy, security, and aesthetic appeal of your home, few elements play as pivotal a role as your choice of
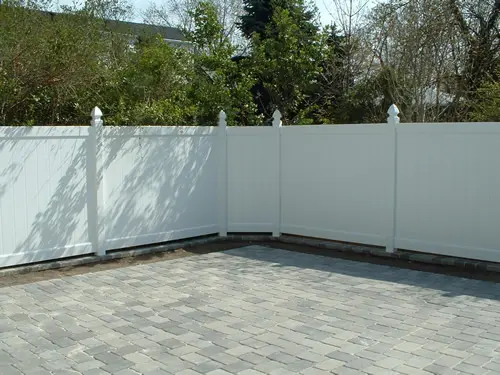
PVC (Polyvinyl Chloride) fencing is a type of synthetic plastic fence that offers a modern alternative to traditional materials like wood and metal. Distinguished by its durability and low maintenance, PVC fencing comes in various styles and colors to suit different aesthetic preferences and functional requirements.
One of the primary benefits of PVC fencing is its resistance to environmental factors. Unlike wood, PVC does not rot, warp, or splinter, making it ideal for climates with harsh weather conditions. Additionally, it does not require painting or staining, saving homeowners time and money on upkeep.
Security, privacy, and aesthetic appeal are other significant advantages that make vinyl fence panels a preferred choice among homeowners.
Proper installation of PVC fencing is crucial to ensure its longevity and functionality. Incorrect installation can lead to issues like sagging sections, misalignment, and even structural failures during extreme weather.
Therefore, understanding the installation process, including the correct measurement, post-setting, and panel attachment techniques, is essential for a stable and long-lasting fence.
Before you leap into the physical aspect of setting up your PVC fence, a crucial planning phase is necessary to ensure a smooth installation process.
This phase involves three key steps: assessing your property, determining the fence layout and design, and obtaining the necessary permits.
The first step is to carefully assess the terrain of your property for your vinyl fence. Identifying any sloping areas, obstacles, or unusual features in the landscape will help you understand the challenges you might face during installation.
It’s also important to pinpoint the exact boundaries of your property to ensure your fence is built on your land and not encroaching on your neighbor’s property.
Once you’ve assessed your property for your vinyl fence installation, the next step is to decide on the layout and design of your post holes. Consider the purpose of your fence (e.g., privacy, decoration, security) and choose a design that meets your needs and complements your home’s architecture.
You must also decide on the height, color, and style of your vinyl fence posts, as well as how many gates you will need and where they will be located.
Before you start digging, it’s vital to check with your local municipality or homeowner’s association to see if you need a permit for installing a vinyl fence. Failure to obtain the necessary permits can result in fines or being required to remove your fence.
Additionally, call 811 to have utility lines marked on your property to avoid damaging them during installation. This step is not only a legal requirement but also ensures the safety of your installation process.
Once you’ve decided to install posts for your vinyl fencing project, preparing adequately can make the difference between a smooth installation and potential setbacks.
Here’s a breakdown of the essential steps for your DIY vinyl fence:
Before beginning your installation, ensure you have all the necessary tools and materials at hand. You’ll need a variety of tools including a post-hole digger or auger, level, tape measure, string line, and saw suitable for cutting vinyl fences.
Material-wise, besides your PVC fencing panels, posts, and gates, make sure you have enough concrete mix to secure your fence posts, and any specific hardware recommended by the manufacturer for assembling the fencing components.
Safety should always come first, regardless of whether you’re installing wood fences or vinyl panels. Wear protective gear such as safety glasses, gloves, and ear protection, especially while cutting or drilling.
Be mindful of local utility lines; always call your utility companies to mark any underground lines before digging begins. Read through the manufacturer’s installation guide since all vinyl fence kits are different, and you must thoroughly inspect it for any additional safety tips related to your specific fencing product.
Start by outlining where your gate posts will go. Most vinyl fence kits include stakes and string to mark the new fence line, maintaining a straight line to ensure your fence will be properly aligned.
Clear the fence line of any obstructions such as rocks, roots, or debris. Measure carefully to determine where each post hole will be dug, keeping the spacing consistent as recommended by your fencing manufacturer.
Preparing your work area thoroughly will streamline the installation process, helping you avoid unnecessary delays in your vinyl fence project.
To begin, mark the corners of the area where you plan to install your PVC fence. Dig holes approximately 3 feet deep and 10 inches in diameter at each marked location. It’s crucial to check local utility lines before digging.
Place the corner posts into the holes, ensuring they’re level and straight. Fill the holes with concrete, leaving it to set according to the manufacturer’s recommendations. This step provides the foundational support for your PVC fence.
Once the corner posts are set and the concrete has fully cured, measure and mark the positions of the line posts along the fence line, typically 6 to 8 feet apart depending on the specific panel length. Dig the holes for these posts, following the same depth and diameter guidelines as the corner posts.
Insert the line posts, use a level to ensure they’re straight, and then fill the holes with concrete. Allow the concrete to cure as per the guidelines.
After your posts are securely in place, it’s time to attach the rails and panels. Start by sliding the bottom rail into the pre-cut holes in the first post.
Next, insert the PVC panels into the bottom rail, then slide the top rail over the panels and into the post. Continue this process along the fence line. For the best results, ensure the rails are level as you go.
Finally, to install a gate, first attach the hinge hardware to your gate post and gate, ensuring they are accurately aligned.
Hang the gate and then install the latch mechanism. Double-check that the gate opens and closes smoothly. If your design includes decorative caps or other accessories, attach them according to the manufacturer’s instructions to finish off your fence installation.
Achieving a straight alignment is crucial for a visually appealing PVC fence. Start by tightly stretching a string between the corner posts at the desired fence height. This line will act as your guide, ensuring each post is aligned both vertically and horizontally.
Use a level to verify that posts are perfectly upright. Additionally, consider the use of laser levels or sighting poles at various points to maintain a consistent linear path across longer distances.
Uniform spacing between posts not only contributes to the aesthetic of your fence but also ensures its stability and strength. Typically, PVC fence posts are spaced 6 to 8 feet apart; however, always refer to the manufacturer’s recommendations.
To maintain equal spacing, use a measuring tape and temporary markers like spray paint or stakes. This approach guarantees that each section of your fence is evenly distributed, eliminating discrepancies and potential weak points.
Installing a PVC fence on sloped or uneven terrain can be challenging. One strategy is to “step” the fence, where sections are installed level but start and stop at varying heights to conform to the slope.
Alternatively, the “racked” installation allows the fence panels to follow the terrain closely, maintaining a uniform base height. Both methods require careful planning and measurement, ensuring that each piece is correctly adjusted for the slope while maintaining a cohesive appearance.
While PVC fences are known for their durability and low maintenance requirements, like any DIY project, you might encounter a few hurdles during installation. Here are solutions to some common issues:
Ground obstacles like rocks, roots, or uneven terrain can hinder the installation of your PVC fence. If you encounter a rock or root, use a shovel or a pickaxe to remove them. For uneven ground, you may need to level the area by adding or removing soil. Remember, maintaining an even surface is crucial for a stable fence installation.
Misaligned panels can compromise the aesthetics and structural integrity of your fence. If panels aren’t aligning correctly, check the post levels; an off-level post is often the culprit.
Adjust the post placement in the ground or use shims to correct minor misalignments. Ensure all posts are vertically straight using a level.
Accidents happen, and a panel or section of your PVC fence might get damaged. Fortunately, PVC fence panels can often be replaced individually without needing to dismantle large sections of the fence.
Match the replacement panel to your existing fence in size, style, and color. Carefully remove the damaged panel and slide the new one into place, securing it according to the manufacturer’s instructions.
When it comes to ensuring the durability and longevity of your PVC fence, there are several proactive measures you can undertake. These steps not only protect your investment but also maintain the fence’s aesthetic appeal over time.
One of the most effective ways to safeguard your PVC fence is by applying protective coatings. These specialized coatings are designed to resist UV damage, prevent discoloration, and protect against harsh weather conditions.
Applying a protective layer every few years can significantly extend the lifespan of your fence, keeping it looking new for longer.
Regular maintenance is key to prolonging the life of your PVC fence. This includes routine cleaning with a mild detergent and water to remove dirt, grime, and mildew.
Inspect your fence periodically for any signs of damage or wear, such as cracks or loose panels, and address these issues promptly. Keeping the fence clean and well-maintained not only enhances its appearance but also prevents long-term damage.
Different climates pose unique challenges for PVC fences. In areas with extreme temperatures, expansion and contraction can affect the integrity of the fence. In such cases, ensure that your PVC fencing is designed to accommodate these fluctuations.
In regions prone to high winds, securing the fence panels and posts properly is crucial to withstand the forces. By considering the specific climate challenges of your area and preparing accordingly, you can significantly enhance the durability and lifespan of your PVC fence.
When it comes to personalizing your PVC fence, the possibilities are nearly endless. When you integrate various decorative elements, lighting features, and exploring the spectrum of color options, you can transform your fence into not only a privacy solution but also an aesthetic statement.
Decorative elements such as post caps, lattice designs, or even unique gate hardware can significantly enhance the visual appeal of your PVC fence.
These additions not only serve an aesthetic purpose but can also reflect your personal style and the architectural characteristics of your home. By selecting from a variety of designs, you can create a fence that is both functional and visually captivating.
Lighting can play a crucial role in transforming the ambiance of your outdoor space. Integrating low-voltage LED lights within or along your PVC fence can offer both practical and aesthetic benefits.
Such lighting enhances safety by illuminating pathways and adds a warm, inviting glow to your garden or yard. From spotlights to post lights, the options allow for creativity in design and function.
Gone are the days when PVC fences were only available in the standard white. Today, manufacturers offer a wide range of color options to suit different tastes and complement various home exteriors.
From subtle earth tones to bold and vibrant hues, choosing the right color can dramatically impact the overall look of your property. Additionally, some PVC fence products are available with textures that mimic natural wood, offering the classic look of wood without maintenance.
By considering these customization options, you can create a PVC fence that not only meets your needs for privacy and security but also enhances the beauty of your property.
In conclusion, setting up a PVC fence is a rewarding venture that enhances not only the aesthetics of your home but also its value and privacy.
We’ve walked through the essential steps, from planning and sourcing materials to the actual installation process.
Looking ahead, envision the beauty and enjoyment your new PVC fence will bring. It’s a testament to your hard work and dedication, serving as a durable, low-maintenance, and attractive addition to your property for years to come.
By submitting, you agree to receive emails from Uscreen and to our privacy policy.
When it comes to enhancing the privacy, security, and aesthetic appeal of your home, few elements play as pivotal a role as your choice of

PVC (Polyvinyl Chloride) fencing is a type of synthetic plastic fence that offers a modern alternative to traditional materials like wood and metal. Distinguished by
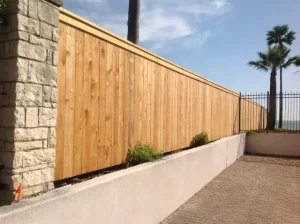
Wood fences are one of the most traditional and versatile types of fencing used to delineate property lines, enhance privacy, and contribute to the aesthetic
Complete the form below and a representative will contact you shortly.