
![The Great Fence Debate Wood Versus Vinyl [How to Choose]](https://www.dcfence.com/wp-content/uploads/2024/04/The-Great-Fence-Debate-Wood-Versus-Vinyl-How-to-Choose-300x157.webp)
The Great Fence Debate: Wood Versus Vinyl [How to Choose?]
When it comes to enhancing the privacy, security, and aesthetic appeal of your home, few elements play as pivotal a role as your choice of
Looking for a step-by-step guide on how to build a covered patio to enhance your backyard living space? Building a covered patio can provide the perfect solution if you’re planning to entertain guests, have family barbecues, or enjoy the outdoors.
This guide will walk you through everything necessary to construct and design a beautiful covered patio, from selecting materials and supplies to creating plans for safety measures. So let’s get started – here’s everything you need to know about designing and constructing a spectacular patio cover.
Planning and preparing are essential to ensure the project’s success if you consider building a covered patio. Here are some crucial steps to take:
The first step is determining where to build your covered patio. Consider factors such as the amount of sun exposure, proximity to your home, and the view from the patio.
Once you’ve chosen a location, measure the area to determine the size of the patio flooring you want to build. Mark the area using stakes and strings or marking spray paint.
Based on your measurements and preferences, decide on the size and shape of the patio. The size and shape will also determine the amount and type of materials you will need.
Choose materials that complement your home’s style and design preferences, such as wood, concrete, or brick. Consider factors such as durability, aesthetic appeal, and maintenance requirements.
You may need permits to build a covered patio depending on your local building codes and guidelines. Check with your local zoning and building department to determine what permits you need to obtain before starting the project.
Finally, determine your budget for the project. Research the costs of materials, labor, permits, and funding accordingly. Remember to include a contingency budget for any unexpected expenses that may arise during the construction process.
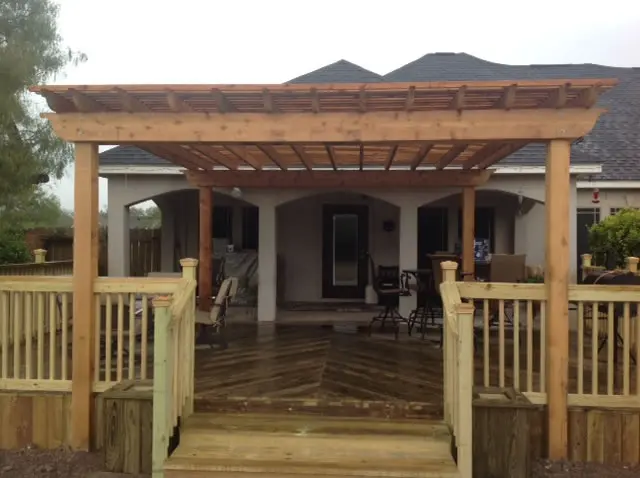
When designing the covered patio, a few key elements must be considered. First on the list is selecting the perfect style to complement your home and personal taste. The options are endless: a rustic wooden pavilion or a sleek and modern aluminum awning. Next, it’s time to choose a suitable roofing material to protect you from the elements.
The right choice, from shingles to metal panels, will enhance your space’s overall look and feel. Of course, the covered patio is only complete with proper ventilation and lighting to keep you comfortable and create the right ambiance. And finally, incorporating the patio seamlessly into your surrounding landscape will create the ultimate outdoor oasis and leave your guests in awe.
Once you have completed the planning and preparation steps for building a covered patio, the next step is to make the foundation. Here’s what you need to know:
The foundation is the base of your covered patio, and you have a few options. You can pour a concrete slab, use precast concrete piers, or build a masonry foundation. Choose the type of foundation based on the size of your patio, the climate, and the soil conditions.
Before pouring the foundation, ensure the site is clear of debris or vegetation. Excavate the area to a depth based on the type of foundation you have chosen. If you are pouring a concrete slab, level the site and compact the soil, forming a layer of gravel. If you’re using precast concrete piers, dig holes where the piers will be placed and fill them with gravel.
Once the site is ready, it’s time to pour the foundation. If you’re doing it yourself, prepare the concrete mixture following the manufacturer’s instructions. If you’re hiring a contractor, they will pour it for you. Ensure that the foundation is level. Allow the foundation to cure for at least 48 hours before placing any weight on it.
After building the foundation for your covered patio, the next step is to frame the patio. Here’s what you need to do:
1. Building the frame: Start by building the frame to support the covered patio roof. Using lumber, measure and cut the frame based on the size and shape of the patio. Ensure the frame is level and square before attaching the support posts.
2. Installing the support posts: Next, install the support posts for the patio. The number of posts will depend on the size and shape of the patio. Space the posts evenly along the outside edge of the frame and ensure they are vertical. To secure the posts, dig post holes to a depth below the frost line and fill them with concrete.
3. Attaching the beams: Once the support posts are in place, attach the beams to the posts. Again, the number of beams will depend on the size and shape of the patio. Measure and cut the beams and attach them to the support posts using metal brackets or straps.
4. Adding cross bracing: Finally, add cross bracing to the patio frame. Cross bracing strengthens the structure and prevents swaying in the wind. Use lumber to form triangular shapes between the support posts and beams. Then attach them with screws or nails.
After framing the patio, the next major step is to install the roof. Here’s what you need to do:
1. Choosing the roofing material: Choose one that complements your home’s style and climate. Popular options include asphalt shingles, metal panels, and tiled roofing.
2. Installing the roof trusses: Use prefabricated roof trusses to support the roofing material. Install the trusses onto the frame of the covered patio, ensuring they are level and properly spaced. Use metal tie-downs to secure them to the frame.
3. Adding roofing panels: Install the patio cover roof panels based on the type of material you have chosen. For asphalt shingles, start at the bottom of the roof and work up. For metal panels, use screws to attach them to the trusses. Tiled roofing requires additional support, so add extra trusses accordingly.
4. Adding gutters and downspouts: To prevent water damage to the outdoor patio and home, add gutters and downspouts. Place the gutters at the roof’s edge and install downspouts along the vertical support posts, directing water away from the patio and home.
Adding finishing touches to your covered patio can create a comfortable and inviting outdoor living space. You can start by installing lighting that complements your patio’s ambiance, like string lights or solar-powered lanterns, while ceiling fans regulate air circulation. Painting or staining the outdoor patio can enhance its appearance and preserve it from outdoor elements; it is crucial to consider the color that compliments your patio’s decor and your home’s architectural style.
Lastly, add comfortable and weather-resistant outdoor furniture like chairs, tables, and sofas to make your space functional and beautiful. Outdoor decors like planters, statues, and rugs can complete the look and provide a welcoming touch.
Once you have built a covered patio and added finishing touches to the space, regular maintenance and care are necessary to ensure that it remains an attractive and functional outdoor living area. Cleaning and upkeep of the patio are crucial to keep it looking pristine. Sweeping regularly and using a pressure washer to remove tough stains or overgrowth are ways to keep the patio clean.
Additionally, protecting the patio from the elements is essential to maintain the patio’s longevity over time. Ensure that the structure is appropriately sealed and use sealant or paint as required to prevent damage caused by sun exposure and rain. Addressing damage as soon as it is noticed is crucial to prolong the life span of your covered patio. Small cracks or chips need to be fixed as quickly as possible to prevent further harm.
Building a covered patio can be an intimidating project for many homeowners, but following our step-by-step guide can easily complete it. Of course, consider safety first when taking on any home improvement project. As always, save some time in the hours of hard work by calling a professional and experienced fence contractor like D&C Fence Co. From start to finish, they will make sure your outdoor living space is correctly realized and efficiently so that you can take pride in the final product knowing that it was done safely and correctly.
By submitting, you agree to receive emails from Uscreen and to our privacy policy.
When it comes to enhancing the privacy, security, and aesthetic appeal of your home, few elements play as pivotal a role as your choice of
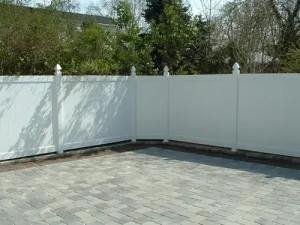
PVC (Polyvinyl Chloride) fencing is a type of synthetic plastic fence that offers a modern alternative to traditional materials like wood and metal. Distinguished by
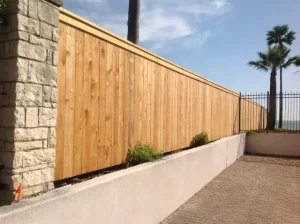
Wood fences are one of the most traditional and versatile types of fencing used to delineate property lines, enhance privacy, and contribute to the aesthetic
Complete the form below and a representative will contact you shortly.